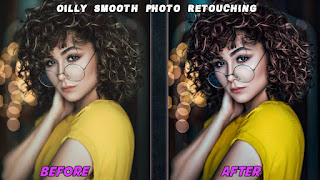
Face Smooth + Oil Paint Photo Editing Tutorial For Beginners
Hello friends! How are you? I hope you're well. Welcome you to a brand new photo editing tutorials. In this post we are going to learn about how to smooth a face in mobile photos editing & we also know more details about putting oil paint effect with a simple way.
After finished the article you will successfully make a photos like this. before starting this article make sure install these photo editing apps via Google Play store.
- Toolwiz
- Lightroom
- Snapseed
1. Oil Paint on face with Toolwiz app
This is first step of this article. First of all select your image and import it in Toolwiz app. Then goto effects option and select soft smudge option. Then apply a effect according to image quality, I select (IV) effect & I thik it better with my image.
.webp) |
After selecting the effect, click on the mask option to customize this effect manually. To adjust the brush size, opacity click on the config button and customize it.
After adjustment the brush size then erase your eye, nose & lips point to keep there details & sharpness. Once you do this step then again apply it with low level of soft smudge effect like ( III ) then save it in your gallery.
2. Adjust color & sharpness with Lightroom app
It is a important step of this article. Here's we will do professional color grading with lightroom mobile app, because it was a very powerful editing apps for android. For changing colour of the image import your image on lightroom then apply auto effect first, then go to light tool and customize all these options according to which increasing or decreasing option increases the brightness of your image and looks beautiful.
Now go to color tools and change the color by selecting all the colors you want to change. Color are the most important thing in editing sector so, keep attention when you chenge it.
After changing of this photo now time to applying effects & detail. Go to effect tool and increase the amount of (texture, clarity, dehaze & vignette) effects.
Then go detail option & increase the amount of sharpening, details & masking in little bit.
After successfully applied all of the settings in lightroom app, now time to save the photos in your gallery. To know more details about today's tutorial and to get better results, please watch the video tutorial from below......
3. Retouch the photo in Snapseed app
Now we will retouch the photo with snapseed app to get the image better. Snapseed is a very powerful app for image editing. If you're a old editor i think you must know about this app. Snapseed tutorial is difficult to explain in writing so please watch the full video tutorial below and follow the steps shown in the video.
Video Tutorial Here:
I hope you will be get a good tutorial for photo editing. Please give a comment about this article & keep supporting Shamim Editz. Thanks!


.webp)
.webp)
.webp)

অর্ডিনারি আইটির নীতিমালা মেনে কমেন্ট করুন। প্রতিটি কমেন্ট রিভিউ করা হয়।
comment url