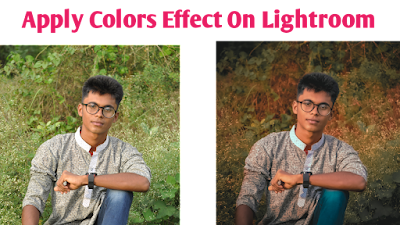
'Faded Tail' is a amazing effects for photo editing world. It is a most trending lightroom colour effect.
In this post, I will be going to show you how to put Faded Tail effect on your photo using lightroom mobile app.
Some about of this effects
Faded Tail looks like as a lightroom preset. But it's not a presets file.
Because, you can put all the setting manually after put all of the setting then you save your photo as a presets file like .DNG.
Let's go and get started this lightroom editing tutorial.
First of all, share or import your photo on lightroom. Then follow the few steps & screenshot.
Step 1:
Go to light option. Then increase the Exposure value in a little bit.
- Then decrease Contrast value around (-60)
- Then decrease Highlight range around (-70)
- Then increase Shadows value up-to (+50)
- Now decrease White range upto (-80)
- Then decrease Blacks range around (-50)
Step 2:
Go to Colour Tools. Then increase or decrease all of the colours range according with this screenshot.
- Temp: -2
- Tint: +19
- Vibrance: +80-90
- Saturation: -20
Know more about the color greading tool of lightroom please read this post....
Step 3:
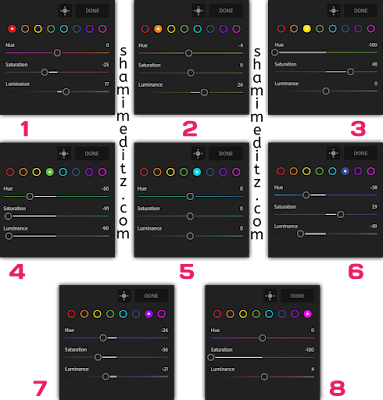
After applying settings according to step no 2 then go to HSL Option on the Colour Tools in Lr. Then adjust all of the colours value. Follow screenshot.
Step 4:
Go to Effect tool then adjust some of value likes,
- Texture: -50
- Clarity: + 40,50
- Vignette: -50
- Midpoint: -40
- Feather: +70
Then apply it .
Step 5:
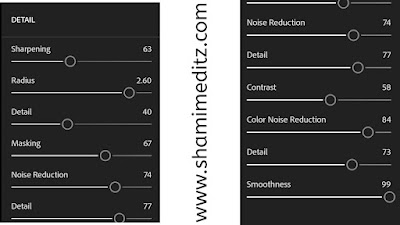
Now go to Detail option in the Lr app.
Then make chenge the setting range to,
- Sharpening: +60
- Radius: 2.60
- Detail: +40
- Masking: +60
- Noise Reduction: +70
- Detail: +77
- Contrast: +60
- CNR- Color Noise Reduction: +80
- Detail: +70
- Smoothness: +90 to 100
Then apply it.
After all of this setting applied successfully, Now time to save / export the photo.
Remember: If your photo quality are bad or good then attention to applying all of this setting. You must chenge the value of setting according to your photo for better results.


.webp)
.webp)


1 Comments
Good 👍👍
ReplyDelete